- A Designer prepare the InDesign templates with the approved design.
- A Product Manager (this is just an example, it could be any other role) prepare the campaign data.
- WebProof can integrate with different kinds of system, like an ERP or with a simpler method like using an Excel sheet. - Now the Product Manager changes the status code in WebProof. This triggers the system to merge the data, the InDesign template, and the images and graphics to produce a new merged InDesign file and a preview in WebProof.
Note: A trigger button can be implemented in the ERP system or in another way. - Once this is set up, the product manager can produce a whole catalogue (or selected pages) in minutes. There is a preview in WebProof. They can make sure the data source has been updated (with replacement text, images or graphics) and loop thorugh as many versions as needed.
- If more advanced changes are needed, comments can be added via sticky notes and the status code can be changed in WebProof. Now the designer will automatically get a notification and immediately take over.
- If the changes are general, a designer has the option to make changes to the template and notify the product manager with a status code change. The product manager can again trigger the merge status and preview the changes for the updated design.
- It’s also possible for other proofreaders to be involved in the loop to proofread in WebProof. They can only add comments to the pages using sticky notes and they can change the status code to indicate they are done commenting. The Product Manager then has the option to update the data source and merge a new update.
- So far the loop is controlled by the product manager alone and the merged InDesign documents are always aligned and updated with the data source, since it is merged from the data and the template.
Now you can continue with a normal WebProof proofreading process and either involve other proofreaders, who can edit the merged pages via a direct InDesign correction, or allow the designer to edit the InDesign document directly with layout adjustments. At this stage, it is the merged document that is being updated and it is, therefore, not possible to sync with the data source anymore
Catalogue Builder Setup
InDesign Template
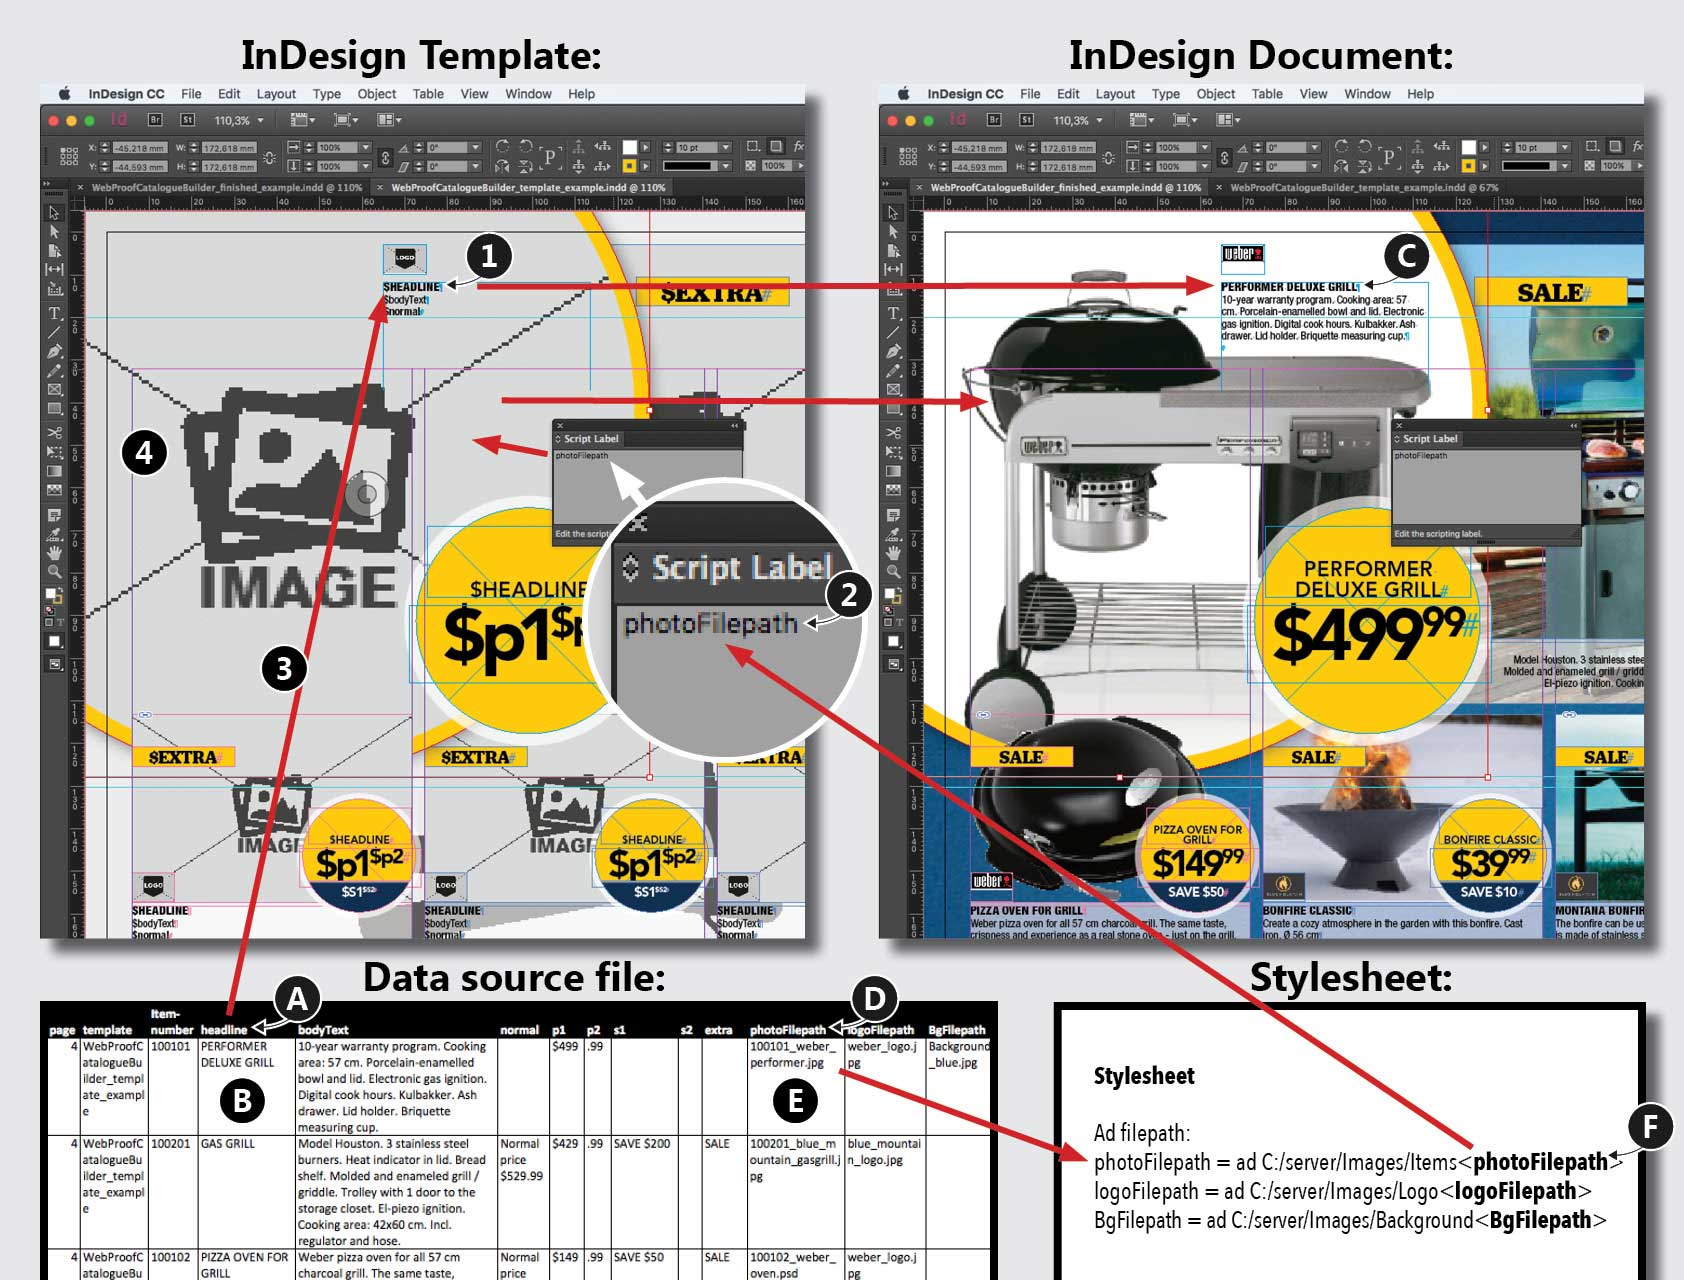
In general, you identify the pages of your publications that you want to use as a template design and convert the text, images and graphics to data-field placeholders. The illustration above shows how the data are merged into the final InDesign document. To create the InDesign template, you basically turn the process around:
- Take a layout in the InDesign document and replace the text fields with data-field placeholders “$xxxx” (1) and ad script labels to image fields (2).
- We recommend that you create placeholder images (3) for the template to make sure it is easy for the users to recognise the template design in WebProof.
- Note that you only have to convert the text and images you want to automate. You may want some content to be static, like a background image.
Text
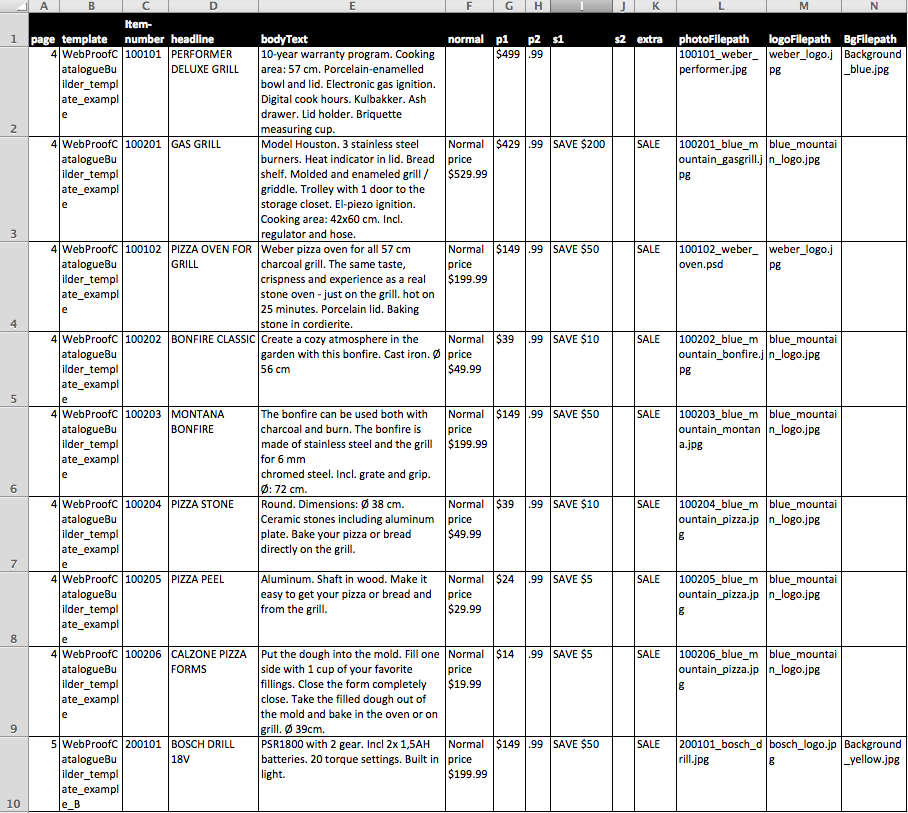
The data source file contains the information that varies in each iteration of the target document, such as the different text fields. It is important to understand that each different style (4) within a text field needs its own data-field placeholder. A data source file is made up of fields and records. Fields are groups of specific information, such as headlines, body text and prices, whereas records are rows of complete sets of information, such as the specific headline, body text and price.
- The template contains the data-field placeholder. It is written as “$xxxx” (1) and is related to the fields in the data source (A).
- You get the result (C) when the field record (B) from the data source is merged with the data-field placeholder (1).
Images and graphics
Image names are defined in the same way as described for a text data source (D). However, for InDesign to be able to link images and graphics, it is also necessary to specify the link path. This could be done in the data source record itself (E), but it can also be defined in a style sheet (F).
Examples
- Link path specified directly in the data source:
C:/server/images/maps/NE045_NE068_FC_bc_uk.pdf
- Link path rule specified in a style sheet, which returns the same result as in example 1 (F):
Stylesheet: photoFilepath = ad C:/server/Images/Items<photoFilepath>
Data source: 100101_weber_performer.jpg
Data source requirements
Steps for setting up the data:
Determine which data fields you’ll be using in your source and target documents.
Examples of data fields:
- Page
- Template
- Headline
- photoFilepath
Spreadsheet data source example:
Handling data from ERP, PIM, DAM or other systems
Data management systems can be integrated. In general, the data will be exported to an XML file from the system to the WebFlow server. The XML will contain the data – the text and information about any images and their location.
In some systems, special codes can indicate the type of campaign or the product ID. Even though these codes are not readable text or do not contain sufficient information about, for example, images, we can set up rules with a style sheet to convert the codes into useful data.
Example of how a style sheet can be used to convert system codes:
| System Code | Style sheet conversion |
| SA | SA = SALE |
| LS | LS = Low Season |
| 162754 | Path = Images/160000-169999/162754.psd |
Comments